Tutorial - Deferred Rendering Shadow Mapping
In this tutorial I will present the shadow mapping technique implemented in a deferred renderer. This tutorial will lean on a previous one, Simple Deferred Rendering in OpenGL; I strongly reccomend you to read it before proceeding with this tutorial as most of the code is shared and I will not present those bits that have already been covered in the other tutorial.
Shadow Mapping is the most widely used technique in real time rendering engines today. Almost every game uses some sort of shadow mapping technique to render its shadows, even if often the actual implementation relies on extensions of the basic shadow mapping that we will see in this tutorial. Some more advanced implementations are Cascade Shadow Mapping, Soft Shadow Mapping, Parallel Split Shadow Mapping, etc etc. For this tutorial we will simply try to understand the basics ideas that all these techniques use, which is using a texture (map) to encode useful information to render shadows.
|
|
 |
 |
|
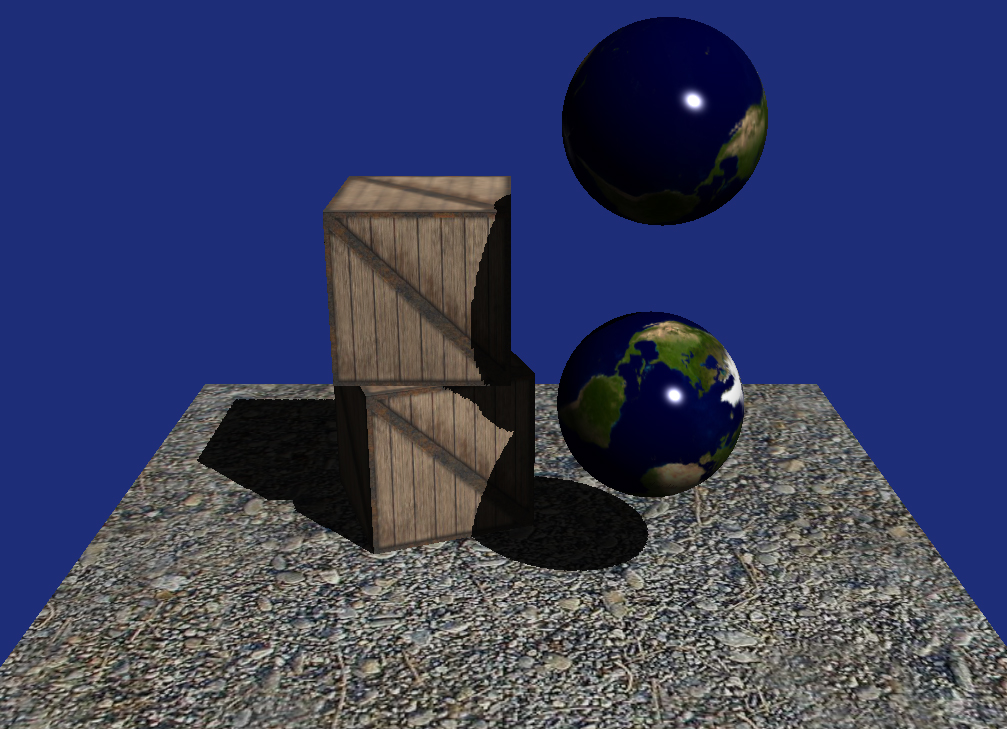
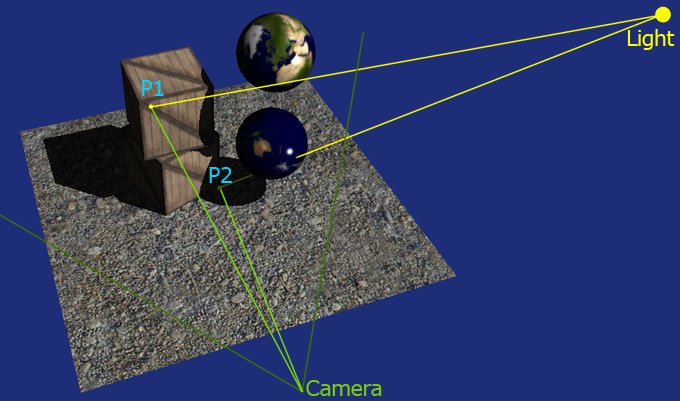
Determining whether a pixel is in shadow or if it's lit by a given light is a visibility problem. What we want to test is if that specific point in the world is visible or not from the light point of view. We apply this idea to every pixel that we are rendering on screen thus what we want to do is to calculate what position each pixel is mapped to in world space. Once we have the position we can cast a ray back to the light. If the ray can reach the light without being interrupted, the pixel is in light, otherwise is in shadow. Watch the picture below (Figure 1). You can see how the two point are both visible from the camera, but just one is visible from the light.
 |
|
Figure 1: Points in shadow and in light |
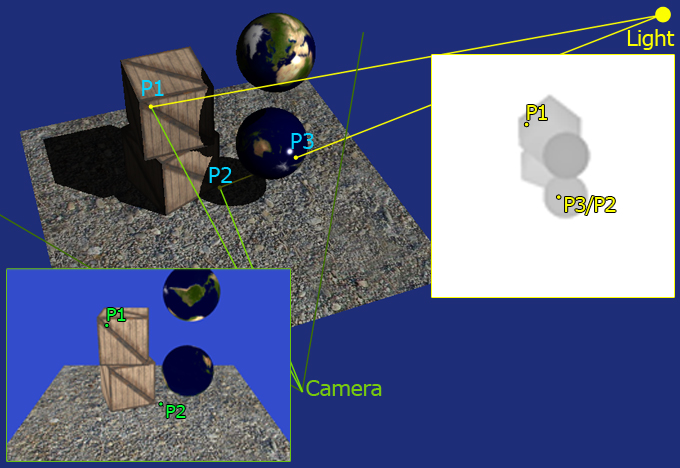
So now we know the principle and we can proceed to the practice. How can we determine whether a pixel (remapped in world) is visible or not from the light position. There are many many ways, but the one we are going to implement takes advantage of the ability of the GPU to render the depth of a scene. So if we set an imaginary camera in the light position and we render the depth of the scene as seen from the light what we get is a texture that contains a bunch of distances. Every pixel of this shadow map can be remapped in world space and will tell you what pixel the light see and how far that point is from the light itself. Watch Figure 2 below. The first point, P1, is visible from both the camera point of view and the light point of view. So if when we render it we also calculate its world position and then calculate the distance from the light we can compare it with the distance saved in the shadow map. When we compare P1's distance we will find that the value we calculate is the same value contained in the map (minus some error due to the way we store depth in the map). This because the pixel is visible frome the light point of view.
If we try to do the same with P2 we'll find a substantial difference. Say we calculate P2 in world space and then we calculate the distance between P2 in world space and the light as we did for P1. Now, if we compare the calculated distance with the distance saved in the shadow map we'll find that the one in the map is way smaller than the one we have just calculated. This because in the map the light will have the distance between P3 and the light itself. In fact, if you see from the light point of view P2 and P3 are overlapped, and since P3 is the closest one it "overrides" P2 which is then not visible. This tells us that P2 is in shadow.
 |
|
Figure 2: Points in shadow and in light seen from light and camera |
This is all you need to implement shadow mapping. Let's see the sample code and let's try to make it as clear as possible.
1
|
I'll try to present the code not from the first to the last line but instead picking various funcionality and explaining what is doing what. So, let's start from the the rendering function.
/**
*	Render the scene
*/
void GLApplication::render()
{
    glClear(GL_COLOR_BUFFER_BIT | GL_DEPTH_BUFFER_BIT);
    glClearColor(0.2f, 0.3f, 0.8f, 1.0f);

    // We move the near plane just a bit to make the depth texture a bit more visible.
    // It also increases the precision.
    glMatrixMode(GL_PROJECTION);

    glPushMatrix();
    glLoadIdentity();
    gluPerspective(20.0f, 1, 40.0f, 70.0f);

    // Set the light position
    glMatrixMode(GL_MODELVIEW);
    glLoadIdentity();
    glRotatef(55, 1, 0, 0);
    glRotatef(-45, 0, 1, 0);
    glTranslatef(-25.0f, -50.0f, -25.0f);
    glRotatef(m_lightRotation, 0, 1, 0);
    glFrontFace(GL_CW);
To start we want to acquire the shadow map, therefore we position the camera in the light's position and we orient it so that it looks down to the scene. We also flip from the standard CCW to CW when rendering the shadow map. This is a nice trick that works as far as every object is "closed". Flipping to CW renders the object "inside out" which means that we will use the back faces for comparing the distances reducing the shadow acne that typically shows up with shadow mapping. This is not mandatory, it just helps a bit in most of the cases (but make it worst in others).
    // Render the shadow map
    m_deferredRendering->startRenderToShadowMap();
    for(int i=0; i<c_modelsCount; ++i)
        m_models[i]->render();
    m_deferredRendering->stopRenderToShadowMap();
We then render all the models into the shadow map. We'll check how the shadow map is created in a moment, for now all we need to know is that here we render all the models' depth into a texture.
Once we have finished with the shadow map we save the matrices and reset everything.
    // We then save out the matrices and send them to the deferred rendering, so when it comes to do the deferred pass
    // it can project the pixel it's rendering to the light and see if it's in shadows
    float worldToLightViewMatrix[16];
    float lightViewToProjectionMatrix[16];
    glGetFloatv(GL_MODELVIEW_MATRIX, worldToLightViewMatrix);
    glGetFloatv(GL_PROJECTION_MATRIX, lightViewToProjectionMatrix);

    // Re-set the projection to the default one we have pushed on the stack
    glMatrixMode(GL_PROJECTION);
    glPopMatrix();

    // Set the camera position
    glMatrixMode(GL_MODELVIEW);
    glLoadIdentity();
    glRotatef(20, 1, 0, 0);
    glTranslatef(0.0f,-6.5f,-11.0f);
    glFrontFace(GL_CCW);

    float worldToCameraViewMatrix[16];
    glGetFloatv(GL_MODELVIEW_MATRIX, worldToCameraViewMatrix);
We store the matrices in some local variables because we need to provide them to the shader to reproject the pixels back in world and into the light clip/projection space. Notice that we also restore the renderer back to render faces CCW.
// Render our geometry into the FBO
m_deferredRendering->startRenderToFBO();
for(int i=0; i<c_modelsCount; ++i)
m_models[i]->render();
m_deferredRendering->stopRenderToFBO();
// Render to the screen
if(m_state == 0)
{
// Render to screen using the deferred rendering shader
m_deferredRendering->setLightMatrices(worldToLightViewMatrix, lightViewToProjectionMatrix, worldToCameraViewMatrix);
m_deferredRendering->render();
}
else if(m_state == 1)
{
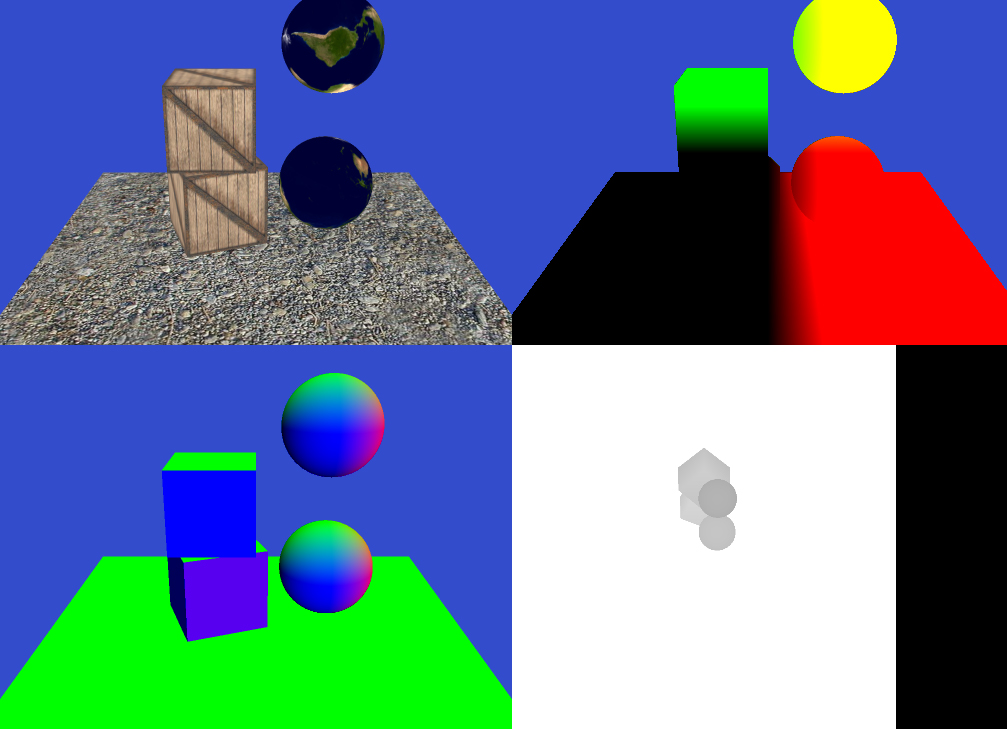
m_deferredRendering->showTexture( 0, (float)m_windowWidth, (float)m_windowHeight, 512, 384, 0);
m_deferredRendering->showTexture( 1, (float)m_windowWidth, (float)m_windowHeight, 512, 384, 512);
m_deferredRendering->showTexture( 2, (float)m_windowWidth, (float)m_windowHeight, 512, 384, 0, 384);
m_deferredRendering->showShadowMap( (float)m_windowWidth, (float)m_windowHeight, 384, 384, 512, 384);
}
SwapBuffers(m_hdc);
}
This is the core of the rendering procedure. Summarizing we acquire the shadow map, save the matrices, send the matrices to the shader and then render. So we now have to see in detail two more things: how we create and use the shadow map and, the most important one, the shader that composes and renders the final frame.
|
2
|
Let's see how do we capture the shadow map. Since all we need to store in the shadow map is the depth, we don't have to create a colour render target. All we need is a render target that can receive depth. To isolate this feature I've created a class called DepthRenderTexture which provides some methods to render the depth into the render target and some debug functionality to show the render target as a texture. The constructor of this class tells OpenGL that we only want to render depth into an FBO:
// Generate the OGL resources for what we need
glGenFramebuffersEXT(1, &m_fbo);
glGenRenderbuffersEXT(1, &m_depthBufferRT);

// Bind the FBO so that the next operations will be bound to it
glBindFramebufferEXT(GL_FRAMEBUFFER_EXT, m_fbo);

// Bind the depth buffer
glBindRenderbufferEXT(GL_RENDERBUFFER_EXT, m_depthBufferRT);
glRenderbufferStorageEXT(GL_RENDERBUFFER_EXT, GL_DEPTH_COMPONENT24, m_width, m_height);
glFramebufferRenderbufferEXT(GL_FRAMEBUFFER_EXT, GL_DEPTH_ATTACHMENT_EXT, GL_RENDERBUFFER_EXT, m_depthBufferRT);

// Generate and bind the OGL texture for diffuse
glGenTextures(1, &m_depthTexture);
glBindTexture(GL_TEXTURE_2D, m_depthTexture);
glTexParameteri(GL_TEXTURE_2D, GL_TEXTURE_MIN_FILTER, GL_LINEAR);
glTexParameteri(GL_TEXTURE_2D, GL_TEXTURE_MAG_FILTER, GL_LINEAR);
glTexParameteri(GL_TEXTURE_2D, GL_TEXTURE_WRAP_S, GL_CLAMP_TO_EDGE);
glTexParameteri(GL_TEXTURE_2D, GL_TEXTURE_WRAP_T, GL_CLAMP_TO_EDGE);
glTexImage2D(GL_TEXTURE_2D, 0, GL_DEPTH_COMPONENT24, m_width, m_height, 0, GL_DEPTH_COMPONENT, GL_UNSIGNED_INT, 0);

// Attach the texture to the FBO
glFramebufferTexture2D(GL_FRAMEBUFFER_EXT, GL_DEPTH_ATTACHMENT, GL_TEXTURE_2D, m_depthTexture, 0);

// Check if all worked fine and unbind the FBO
GLenum status = glCheckFramebufferStatusEXT(GL_FRAMEBUFFER_EXT);
if( status != GL_FRAMEBUFFER_COMPLETE_EXT)
    throw new std::exception("Can't initialize an FBO render texture. FBO initialization failed.");

glBindFramebufferEXT(GL_FRAMEBUFFER_EXT, 0);
Once the OpenGL resource is created we can acquire the texture as we would do with a normal FBO. This is wrapped by the start and stop methods.
Now that we have the depth map we can finally proceed to render our shadow in the main scene.
|
3
|
We are now to the last step of this tutorial. How to combine everything and define whether a pixel is in shadow or not. All the magic happens in the shader, so we will now analyze it bit by bit.
uniform sampler2D tDiffuse;
uniform sampler2D tPosition;
uniform sampler2D tNormals;
uniform sampler2D tShadowMap;
uniform vec3 cameraPosition;
uniform mat4 worldToLightViewMatrix;
uniform mat4 lightViewToProjectionMatrix;
uniform mat4 worldToCameraViewMatrix;

float readShadowMap(vec3 eyeDir)
{...}

void main( void )
{
    // Read the data from the textures
    vec4 image = texture2D( tDiffuse, gl_TexCoord[0].xy );
    vec4 position = texture2D( tPosition, gl_TexCoord[0].xy );
    vec4 normal = texture2D( tNormals, gl_TexCoord[0].xy );

    mat4 lightViewToWolrdMatrix = inverse(worldToLightViewMatrix);
    vec3 light = lightViewToWolrdMatrix[3].xyz;
    vec3 lightDir = light - position.xyz;

    normal = normalize(normal);
    lightDir = normalize(lightDir);

    vec3 eyeDir = position.xyz - cameraPosition;
    vec3 reflectedEyeVector = normalize(reflect(eyeDir, normal));

    float shadow = readShadowMap(eyeDir);
    float diffuseLight = max(dot(normal,lightDir),0) * shadow;
    float ambientLight = 0.1;

    gl_FragColor = (diffuseLight + ambientLight ) * image + pow(max(dot(lightDir,reflectedEyeVector),0.0), 100) * 1.5 * shadow;
};
So what's different from the previous tutorial? For a start we now read the light position from the light matrix (since we have it), but the important bit is obviously the line that calls readShadowMap(eyeDir). At that line we call the funcion that given the camera to pixel vector decides if the pixel we see is in shadow or not. We will see the function in a moment. The shadow value ranges between 0.0 to 1.0. We then use this value to make the diffuse light black and to kill the specular reflection.
The function that does all the complex math is readShadowMap. This function takes the vector camera to pixel's world position and find where this point is in the shadow map.
float readShadowMap(vec3 eyeDir)
{
    mat4 cameraViewToWorldMatrix = inverse(worldToCameraViewMatrix);
    mat4 cameraViewToProjectedLightSpace = lightViewToProjectionMatrix * worldToLightViewMatrix * cameraViewToWorldMatrix;vec4 projectedEyeDir = cameraViewToProjectedLightSpace * vec4(eyeDir,1);
    projectedEyeDir = projectedEyeDir/projectedEyeDir.w;

    vec2 textureCoordinates = projectedEyeDir.xy * vec2(0.5,0.5) + vec2(0.5,0.5);

    const float bias = 0.0001;
    float depthValue = texture2D( tShadowMap, textureCoordinates ) - bias;
    return projectedEyeDir.z * 0.5 + 0.5 < depthValue;
}
The eyeDir that comes in input is in View Space. To find the pixel in the shadow map we need to take that point and covert it into the light's clip space, which means going from Camera View Space into World Space, then into Light View Space, than into Light Projection Space/Clip space. All these transformations are done using matrices; if you are not familiar with space changes you may want to read my article about spaces and transformations.
Once we are in the right space we calculate the texture coordinates and we are finally ready to read from the shadow map. Bias is a small offset that we apply to the values in the map to avoid that because of rounding errors a point ends up shading itself! So we shift all the map back a bit so that all the values in the map are slightly smaller than they should.
Finally we check if the distance between the point and the light (projectedEyeDir) is smaller than the value stored in the depth map. Notice how we need to scale back projectedEyeDir from the -1 -> 1 range to the 0->1 range as the shadow map is in this latter range.
That's it, not too difficult if you graps the idea of chaning space and mapping pixels into a map of dephts! Feel free to grab the code and have a play with it, as usual, trying yourself is way more useful than any explanation.
|
|
|
|