Tutorial - Simple OpenGL Deferred Rendering
Deferred rendering (or deferred shading) is an interesting and ingenuous technique that, differently from forward rendering (or forward shading), postpones light's computation to the end of the rendering pipeline, to image space, similarly to post-processing techniques. The underlying idea is that if a pixel doesn't get to the screen then there is no point in shading it. Once a pixel gets to the image space we know it's going to be visible and therefore we can safely calculate all the lights' influence on it. This makes our shading faster and with per-pixel accuracy. On the other hand with this technique we introduce a serie of issues that we don't have with forward rendering. For example it becomes quite difficult to deal with transparencies and handling several materials requires to store more information in the G-Buffer which can easily bloat the video memory.
Deferred shading has been used in several commercial games, for example Crysis 2 and Dead Space (even if often is not the vanilla version but some variation like Deferred Lighting/Light prepass).
|
|
 |
 |
|
1
|
I'll try to present the code not from the first to the last line but instead picking various funcionality and explaining what is doing what. So, let's start from the the GLApplication class. A GLApplication object is created into the main function and it is then used to initialize and run our simple program.
if(!application.initialize(hWnd, width, height))
    return 0;

ShowWindow(hWnd, SW_SHOW);
UpdateWindow(hWnd);


bool running = true;
while (running)
{
    if (PeekMessage(&msg, NULL, 0, 0, PM_REMOVE))
    {
        if (msg.message == WM_QUIT)
        {
            running = false;
        }
        else
        {
            TranslateMessage(&msg);
            DispatchMessage(&msg);
        }
    }
    else
    {
        application.update();
        application.render();
    }
}

application.release();
As you see from the highlighted bits, the application object is initialized and then used and release. The initialize function takes the Window's handler and extensions as inputs and then sets up all the boring stuff for OpenGL like the context and the starting state. At the very end of this function we will see that we also load our assets and setup the multi render target and the deferred rendering screen. Let's skip it for now and let's focus on the update and the render functions.
Let's start with the update function.
/**
*    Update
*/
void GLApplication::update()
{
    float time = (GetTickCount() - m_lastTick) * 0.01f;
    m_lastTick = GetTickCount();

     m_models[0]->addRotation( time, time*2, 0 );
     m_models[1]->addRotation( 0, time*2, time );
}
Pretty straightforward really; all we do here is calculating a delta for the time that we then use to rotate the two objects in the scene.
So, let's go to the interesting bit!
/**
*    Render the scene
*/
void GLApplication::render()
{
    glClear(GL_COLOR_BUFFER_BIT | GL_DEPTH_BUFFER_BIT);
    glClearColor(0.2f, 0.3f, 0.8f, 1.0f);

    glLoadIdentity();
    glRotatef(20, 1, 0, 0);
    glTranslatef(0.0f,-4.6f,-10.0f);

    // Render our geometry into the FBO
    m_multipleRenderTarget->start();
    for(int i=0; i<c_modelsCount; ++i)
        m_models[i]->render();
    m_multipleRenderTarget->stop();

    // Render to the screen
    if(m_state == 0)
    {
        // Render to screen using the deferred rendering shader
        m_deferredRendering->render();
    }
    else if(m_state == 1)
    {
        m_multipleRenderTarget->showTexture( 0, 512, 384, 0);
        m_multipleRenderTarget->showTexture( 1, 512, 384, 512);
        m_multipleRenderTarget->showTexture( 2, 512, 384, 0, 384);
    }

    SwapBuffers(m_hdc);
}
There we are! This starts to look promising doesn't it? Let's analyze what's going on here. The first couple of lines is really just to clear up the back buffer and to set the whole background to some nice colour. Then we do a few matrix transformations as we would do with a camera. To keep everything simple I've just decided to avoid everything which was not strictly related to deferred shading, therefore these three lines are just rotating the world and then translating it a bit so that we can see it from a slightly higher position.
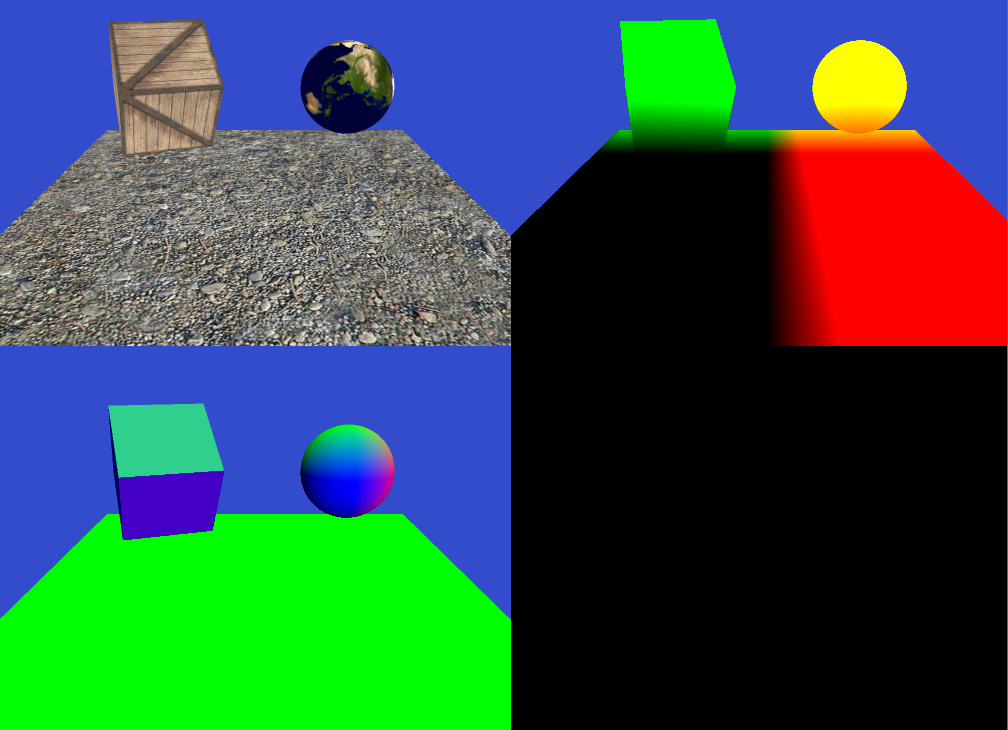
Now that the camera is in place we can render the scene. Since we are doing deferred rendering we won't render the scene straight to the back buffer; instead we render everything into a bunch of textures using a multiple render target (MRT). Now, if you have never used MRTs you will love this. With MRTs we can render into different textures with a single draw call!! This will avoid to transform the vertices more than once boosting our performance. Now the question is, what do we effectively render here and why. Let's have a look to the following picture.
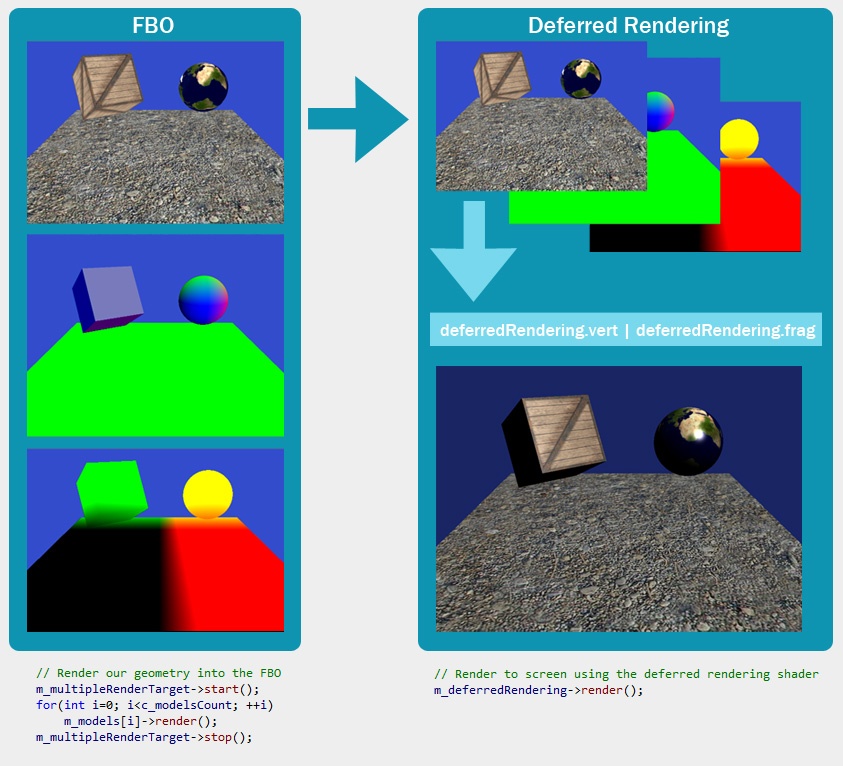
As you can see in the picture we have two steps:
-
Render of the scene into the textures (using Frame Buffer Objects - FBO)
-
Render a big quad screen aligned using the three textures and calculate the lighting
|
|
|
2
|
Let's recall how we acquire the FBOs. The following bit is extracted from the previous snippet of code:
    // Render our geometry into the FBO
    m_multipleRenderTarget->start();
    for(int i=0; i<c_modelsCount; ++i)
        m_models[i]->render();
    m_multipleRenderTarget->stop();
So, we first call start on the MRT object, then we render the models, and then we call stop. The object m_multipleRenderTarget is of type FBORenderTexture; this class is our wrapper for the three textures. Methods start and stop are used to acquire the textures.
/**
*    Start rendering to the texture
*    Both color and depth buffers are cleared.
*/
void FBORenderTexture::start(){
    // Bind our FBO and set the viewport to the proper size
    glBindFramebufferEXT(GL_FRAMEBUFFER_EXT, m_fbo);
    glPushAttrib(GL_VIEWPORT_BIT);
    glViewport(0,0,m_width, m_height);

    // Clear the render targets
    glClear( GL_COLOR_BUFFER_BIT | GL_DEPTH_BUFFER_BIT );
    glClearColor( 0.0f, 0.0f, 0.0f, 1.0f );

    glActiveTextureARB(GL_TEXTURE0_ARB);
    glEnable(GL_TEXTURE_2D);

    // Specify what to render an start acquiring
    GLenum buffers[] = { GL_COLOR_ATTACHMENT0_EXT, GL_COLOR_ATTACHMENT1_EXT,
                         GL_COLOR_ATTACHMENT2_EXT };
    glDrawBuffers(3, buffers);
}

/**
*    Stop rendering to this texture.
*/
void FBORenderTexture::stop(){
    // Stop acquiring and unbind the FBO
    glBindFramebufferEXT(GL_FRAMEBUFFER_EXT, 0);
    glPopAttrib();
}
The code is the usual one for rendering to a texture apart from last lines that are used to set up the MRT stuff. There are two things that we need for MRT, one is this bit that we have just seen, the other is in the shader that we apply to the object. The vertex shader is quite normal, nothing fancy here.
varying vec3 normals;
varying vec4 position;
uniform mat4 ModelMatrix;
uniform mat4 WorldMatrix;

void main( void )
{
    // Move the normals back from the camera space to the world space
    mat3 worldRotationInverse = transpose(mat3(WorldMatrix));

    gl_Position    = gl_ModelViewProjectionMatrix * gl_Vertex;
    gl_TexCoord[0] = gl_MultiTexCoord0;
    normals        = normalize(worldRotationInverse * gl_NormalMatrix *
                               gl_Normal);
    position       = gl_ModelViewMatrix * gl_Vertex;
    gl_FrontColor  = vec4(1.0, 1.0, 1.0, 1.0);
}
While the fragment shader is where the rest of the MRT magic happens. Using the gl_FragData[..] syntax we can output our colour to one of the three textures; the actual order depends on the way we have attached the three textures to the FBO object during the creation of the latter. This binding happens in the constructor of FBORenderTexture objects. The following lines are the relevant ones from the constructor:
// Bind the diffuse render target
glBindRenderbufferEXT(GL_RENDERBUFFER_EXT, m_diffuseRT);
glRenderbufferStorageEXT(GL_RENDERBUFFER_EXT, GL_RGBA, m_width, m_height);
glFramebufferRenderbufferEXT(GL_FRAMEBUFFER_EXT, GL_COLOR_ATTACHMENT0_EXT,
                             GL_RENDERBUFFER_EXT, m_diffuseRT);

...

// Generate and bind the OGL texture for diffuse
glGenTextures(1, &m_diffuseTexture);
glBindTexture(GL_TEXTURE_2D, m_diffuseTexture);
glTexImage2D(GL_TEXTURE_2D, 0, GL_RGBA, m_width, m_height, 0, GL_RGBA,
        GL_UNSIGNED_BYTE, NULL);
glTexParameteri(GL_TEXTURE_2D, GL_TEXTURE_MIN_FILTER, GL_LINEAR);
glTexParameteri(GL_TEXTURE_2D, GL_TEXTURE_MAG_FILTER, GL_LINEAR);
glTexParameteri(GL_TEXTURE_2D, GL_TEXTURE_WRAP_S, GL_CLAMP_TO_EDGE);
glTexParameteri(GL_TEXTURE_2D, GL_TEXTURE_WRAP_T, GL_CLAMP_TO_EDGE);

// Attach the texture to the FBO
glFramebufferTexture2DEXT(GL_FRAMEBUFFER_EXT, GL_COLOR_ATTACHMENT0_EXT,
        GL_TEXTURE_2D, m_diffuseTexture, 0);
The other important bit of the fragment shader is what we put into our output array. The first output is the diffuse component, the second one contains positions and the third is for normals. Let's see the shader.
varying vec4		position;
varying vec3		normals;
varying mat4		TBN;
uniform sampler2D	tDiffuse;

void main( void )
{
	gl_FragData[0] = vec4(texture2D(tDiffuse,gl_TexCoord[0].st).rgb, 0);
	gl_FragData[1] = vec4(position.xyz,0);
	gl_FragData[2] = vec4(normals.xyz,0);
}
So we have seen everything we need to know about the first step, acquiring our data for the deferred rendering. To better understand the code I would suggest you to go through the whole FBORenderTexture class.
|
3
|
Now the final step. We need to use the textures with diffuse, normals and positions to calculate the lighting information. To do so we will render a big quad that covers the whole screen to which we apply a shader that does the deferred rendering itself. The vertex shader is trivial, let's see it.
void main( void )
{
    gl_Position = gl_ModelViewProjectionMatrix * gl_Vertex;
    gl_TexCoord[0] = gl_MultiTexCoord0;

    gl_FrontColor = vec4(1.0, 1.0, 1.0, 1.0);
}
No needs of comments right? Let's see where all the magic happens, the fragment shader.
uniform sampler2D tDiffuse;
uniform sampler2D tPosition;
uniform sampler2D tNormals;
uniform vec3 cameraPosition;

void main( void )
{
    vec4 image = texture2D( tDiffuse, gl_TexCoord[0].xy );
    vec4 position = texture2D( tPosition, gl_TexCoord[0].xy );
    vec4 normal = texture2D( tNormals, gl_TexCoord[0].xy );

    vec3 light = vec3(50,100,50);
    vec3 lightDir = light - position.xyz ;

    normal = normalize(normal);
    lightDir = normalize(lightDir);

    vec3 eyeDir = normalize(cameraPosition-position.xyz);
    vec3 vHalfVector = normalize(lightDir.xyz+eyeDir);

    gl_FragColor = max(dot(normal,lightDir),0) * image +
                   pow(max(dot(normal,vHalfVector),0.0), 100) * 1.5;
}
And there we are, the deferred rendering shader itself. Cool isn't it?! Now, let's start the analysis. The three uniforms at the very beginning are the famous textures we have acquired using MRT. The other uniform is the camera position, we'll need it to calculate the eye direction for speculars.
In the main function the first thing we do is to read what we have acquired previously and to save it to three variables (image, position, normal). Now, to keep everything very simple I've hard coded the light position into the shader. I've picked the arbitrary position 50, 100, 50 but if you make a proper implementation you'll probably pass in the lights position from the C++ code.
We then create a variable called lightDirt to hold the light direction; since we know the position of what we have rendered in this pixel we can calculate the light direction to it. We also know the normal in this pixel, so just to be sure we normalize it and then we normalize the light direction as well. Then we have a few more initializations; we create the eye direction and we use it to calculate the half vector.
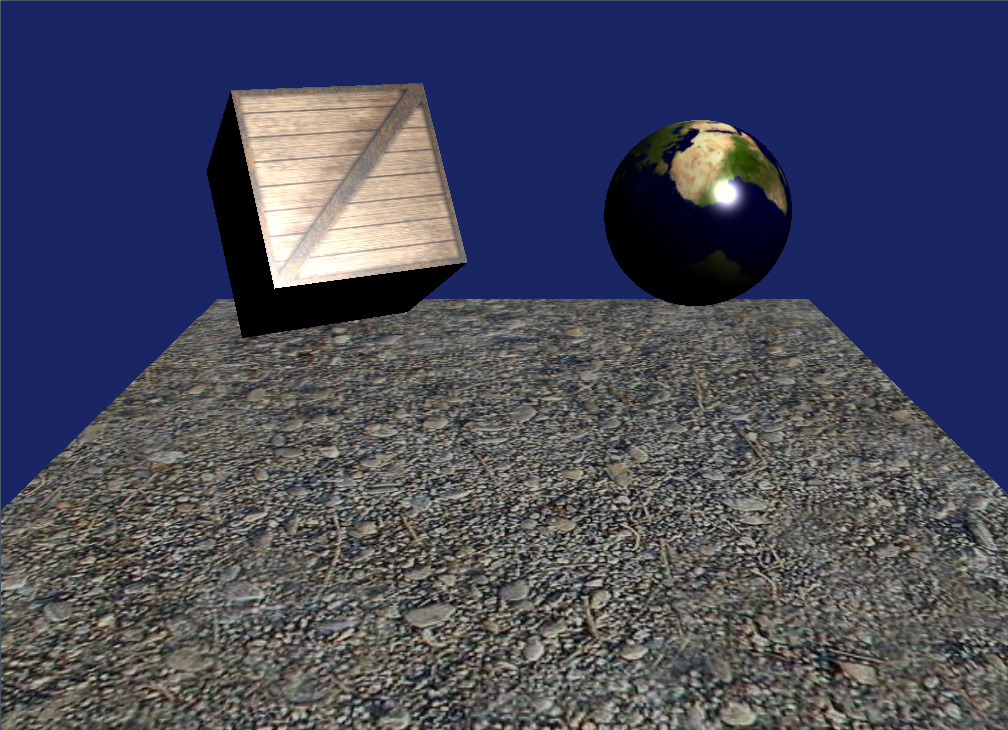
Finally we calculate the light contribution in the final step. We use the usual formula, Lambert for diffusion and Blinn-Phong for the specular. It's all very simple isn't it? The shader is straightforward and you shouldn't have any problem to play with it.
And that's it. I've tried to keep the code as simple as possible and as focused on the deferred rendering as possible, so I hope it was useful and clear to follow.
For whatever you may need, comments, errors notification, requests, etc.., Do not hesitate to contact me at 
|
|
|
|